Smoke testing is a set of tests used to see if the fundamental features of a given build are operating as intended. It is not a comprehensive testing process. This is the initial test that should be performed on any “new” build.
It is evidently impossible to test the complete build and instantly determine whether any implementations have defects or whether any functionalities are broken when the development team sends a build to the QA for testing.
In light of this, how will QA make sure that the basic functionalities are working fine?
The answer to this will be to perform Smoke Testing.
Once the tests are marked as Smoke tests (in the test suite) pass, only then will the build be accepted by the QA for in-depth testing and/or regression. If any of the smoke tests fail, then the build is rejected and the development team needs to fix the issue and release a new build for testing.
Theoretically, the Smoke test is defined as surface-level testing to certify that the build provided by the development team to the QA team is ready for further testing. This testing is also performed by the development team before releasing the build to the QA team.
This testing is normally used in Integration Testing, System Testing, and Acceptance Level Testing. Never treat this as a substitute for actual end to end complete testing. It comprises of both positive and negative tests depending on the build implementation.
Smoke Testing Examples
This testing is normally used for Integration, Acceptance and System Testing.
In my career as a QA, I always accepted a build only after I had performed a smoke test. So, let’s understand what a smoke test is from the perspective of all these three testings, with some examples.
#1) Acceptance Testing
Whenever a build is released to QA, smoke test in the form of an Acceptance Testing should be done.
In this test, the first and most important smoke test is to verify the basic expected functionality of the implementation. This way, you will need to verify all the implementations for that particular build.
Let us take the following Examples as implementations done in the build to understand the smoke tests for those:
- Implemented the login functionality to allow the registered drivers to log in successfully.
- Implemented the dashboard functionality to show the routes that a driver is to execute today.
- Implemented the functionality to show an appropriate message if no routes exist for a given day.
In the above build, at the acceptance level, the smoke test will mean to verify that the three basic implementations are working fine. If any of these three are broken, then the QA should reject the build.
#2) Integration Testing
Usually, this testing is carried out after each module has been implemented and examined separately. This testing is carried out at the Integration Testing level to ensure that all fundamental integration and end-to-end features are operating as intended.
Depending on the degree of integration, the smoke test’s complexity will change. It could involve integrating two modules or all of them together.
Let us consider the following Examples of integration implementation for this testing:
- Implemented the integration of route and stop modules.
- Implemented the integration of arrival status update and it reflects the same on the stop screen.
- Implemented the integration of complete pick up till the delivery functionality modules.
In this build, the smoke test will not only verify these three basic implementations but for the third implementation, a few cases will verify for complete integration too. It helps a lot to find out the issues that get introduced in integration and the ones that went unnoticed by the development team.
#3) System Testing
As the name implies, smoke testing covers the most critical and often utilized system workflows at the system level. This is only carried out once the entire system has been prepared and tested; system-level testing is also known as smoke testing prior to regression testing.
As part of the smoke test, the fundamental end-to-end features are tested prior to beginning the regression of the entire system. The end-to-end test cases that end users will utilize most frequently are included in the smoke test suite for the entire system.
This is usually done with the help of automation tools.
Importance of SCRUM Methodology
Nowadays, the projects hardly follow the Waterfall methodology in project implementation, rather mostly all the projects follow Agile and SCRUM only. Compared to the traditional waterfall method, Smoke Testing holds high regard in SCRUM and Agile.
I worked for 4 years in SCRUM. We know that in SCRUM, the sprints are of shorter duration and hence it is of extreme importance to do this testing so that the failed builds can immediately be reported to the development team and fixed too.
The following are some takeaways on the importance of this testing in SCRUM:
- Out of the fortnight sprint, halftime is allocated to QA but at times the builds to the QA are delayed.
- In sprints, it is best for the team that the issues are reported at an early stage.
- Each story has a set of acceptance criteria, hence testing the first 2-3 acceptance criteria is equal to smoke testing of that functionality. Customers reject the delivery if a single criterion is failing.
- Just imagine what would happen if it was 2 days that the development team delivered you the build and only 3 days are remaining for the demo and you come across a basic functionality failure.
- On average, a sprint has stories ranging from 5-10, hence when the build is given, it is important to make sure that each story is implemented as expected before accepting the build into testing.
- If the complete system is to be tested and regressed, then a sprint is dedicated to the activity. A fortnight may be a little less to test the whole system, hence it is very important to verify the most basic functionalities before starting the regression.
Smoke Test Vs Build Acceptance Testing
Smoke Testing is directly related to Build Acceptance Testing (BAT).
In BAT, we do the same testing – to verify if the build has not failed and if the system is working fine or not. Sometimes, it happens that when a build is created, some issues get introduced and when it is delivered, the build doesn’t work for the QA.
I would say that BAT is a part of a smoke check because if the system is failing, then how can you as a QA accept the build for testing? Not just the functionalities, the system itself has to work before the QA’s proceed with In-Depth Testing.
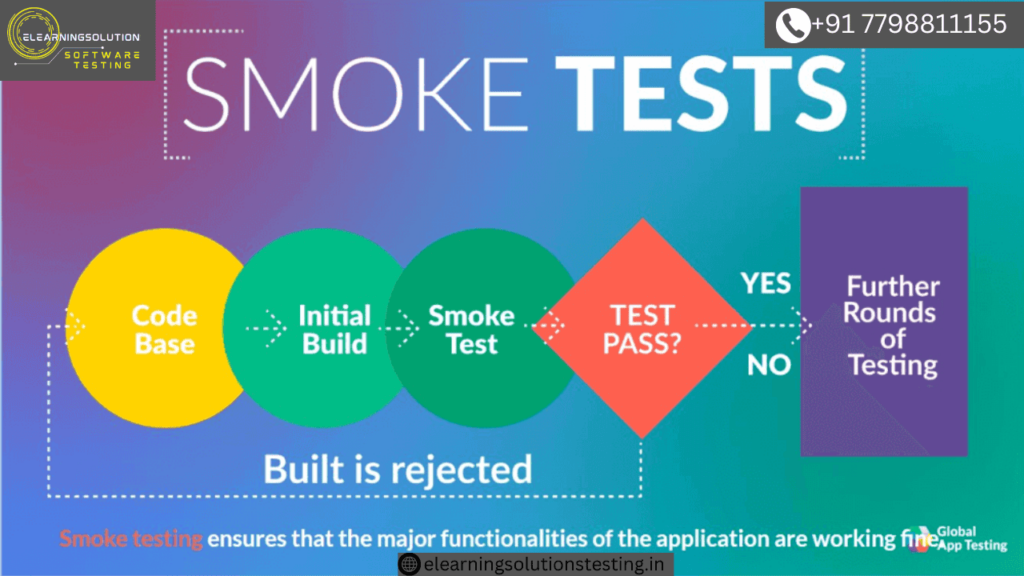
Smoke Test Cycle
The following flowchart explains the Smoke Testing Cycle.
Once a build is deployed to QA, the basic cycle followed is that if the smoke test passes, the build is accepted by the QA team for further testing but if it fails, then the build is rejected until the reported issues are fixed.
Test Cycle

Who Should Perform the Smoke Test?

Not the whole team is involved in this type of testing to avoid the wastage of time of all the QA’s.
As the name implies, smoke testing covers the most critical and often utilized system workflows at the system level. This is only carried out once the entire system has been prepared and tested; system-level testing is also known as smoke testing prior to regression testing.
As part of the smoke test, the fundamental end-to-end features are tested prior to beginning the regression of the entire system. The end-to-end test cases that end users will utilize most frequently are included in the smoke test suite for the entire system.
Hence individual QA’s perform this testing for the stories that they own.
Why Should We Automate Smoke Tests?
When a build is released by the development team or teams, this is the first test to be performed on it. Additional testing is conducted (or the build is rejected) in response to the testing’s findings.
Using an automation tool and scheduling the smoke suite to run whenever a new build is made is the most effective way to carry out this testing. Why should I “automate the smoke testing suite,” you ask?
Let us look at the following case:
Let’s say that you are a week away from your release and out of a total of 500 test cases, your smoke test suite comprises of 80-90. If you start executing all these 80-90 test cases manually, imagine how much time will you take? I think 4-5 days (minimum).
However, if you use automation and create scripts to run all 80-90 test cases then ideally, these will be run in 2-3 hours and you will have the results with you instantly. Didn’t it save your precious time and give you the results about the build-in much less time?
5 years back, I was testing a financial projection app, which took inputs about your salary, savings, etc., and projected your taxes, savings, profits depending on the financial rules. Along with this, we had customization for countries that depend on the country and its tax rules used to change (in the code).
For this project, I had 800 test cases and 250 were smoke test cases. With the use of Selenium, we could easily automate and get the results of those 250 test cases in 3-4 hours. It not only saved time but showed us ASAP about the showstoppers.
Hence, unless it is impossible to automate, do take the help of automation for this testing.
Advantages And Disadvantages
Let us first take a look at the advantages as it has a lot to offer when compared to its few disadvantages.
Advantages:
- Easy to perform.
- Reduces the risk.
- Defects are identified at a very early stage.
- Saves effort, time and money.
- Runs quickly if automated.
- Least integration risks and issues.
- Improves the overall quality of the system.
Disadvantages:
- This testing is not equal to or a substitute for complete functional testing.
- Even after the smoke test passes, you may find showstopper bugs.
- This type of testing is best suited if you can automate else a lot of time is spent manually executing the test cases especially in large-scale projects having around 700-800 test cases.
Smoke Testing should definitely be done on every build as it points out the major failures and showstoppers at a very early stage. This applies not only to new functionalities but also to the integration of modules, fixing of issues and improvisation as well. It is a very simple process to perform and get the correct result.
This testing can be treated as the entry point for complete Functional Testing of functionality or system (as a whole). But before that, the QA team should be very clear about what tests are to be done as smoke tests. This testing can minimize the efforts, save time and improve the quality of the system. It holds a very important place in sprints as the time in sprints is less.
This testing can be done both manually and also with the help of automation tools. But the best and preferred way is to use automation tools to save time.
Difference Between Smoke and Sanity Testing
Most of the time we get confused between the meaning of Sanity Testing and Smoke Testing. First of all, these two testings are way “different” and are performed during different stages of a testing cycle.
| S. No. | Smoke Testing | Sanity Testing |
|---|---|---|
| 1 | Smoke testing means to verify (basic) that the implementations done in a build are working fine. | Sanity testing means to verify the newly added functionalities, bugs etc. are working fine. |
| 2 | This is the first testing on the initial build. | Done when the build is relatively stable. |
| 3 | Done on every build. | Done on stable builds post regression. |
Given below is a diagrammatic representation of their differences:

SMOKE TESTING
- The practice of turning on a new piece of hardware for the first time and declaring it successful if it does not catch fire or emit smoke is where this testing got its start. This method of testing is broad and superficial in the software business, covering every aspect of the application without delving too deeply.
- Either an automated test or a written collection of tests is used to script the smoke test.
- Smoke tests are designed to touch every part of the application in a cursory way. It’s shallow and wide.
- This testing is conducted to ensure whether the most crucial functions of a program are working, but not bothering with the finer details. (Such as build verification).
- This testing is a normal health check-up to the build of an application before taking it to test in-depth.
SANITY TESTING
- A sanity test is a narrow regression test that focuses on one or a few areas of functionality. Sanity Testing is usually narrow and deep.
- This test is usually unscripted.
- This test is used to determine that a small section of the application is still working after a minor change.
- This testing is cursory testing, it is performed whenever a cursory testing is sufficient to prove that the application is functioning according to specifications. This level of testing is a subset of regression testing.
- This is to verify whether the requirements are met or not, by checking all the features breadth-first.
You may be interested in:
What is the impact of User Acceptance Testing